Here's the final 10-liner, as written by hand on my Atari 1200XL. It actually comes in under 10 lines. This is considered a "PUR-120" submission; each line can be entered directly into the Atari editor, which allows up to 3 physical lines (40 columns max) per logical line (40×3=120). In some cases, removing spaces and/or utilizing abbreviations had to be done to get it to fit (e.g., "N.A", which expands to "NEXT A" when LISTed.) In the end, since the program is only 8 lines long, that could've been skipped... or maybe I should've submitted this under "PUR-80"?
Per new rules in 2017 — "In addition to the tenliner, the same program must be submitted in 'long version', that means, with one command per line" — the following listing was also created. And here, each command is explained, with mnemonics given for POKE'd memory addresses. Some screenshots of each step of the program are alos provided; click the thumbnails to view the full versions (taken with Atari800 emulator with NTSC filter enabled, for that old-skool CRT look!)
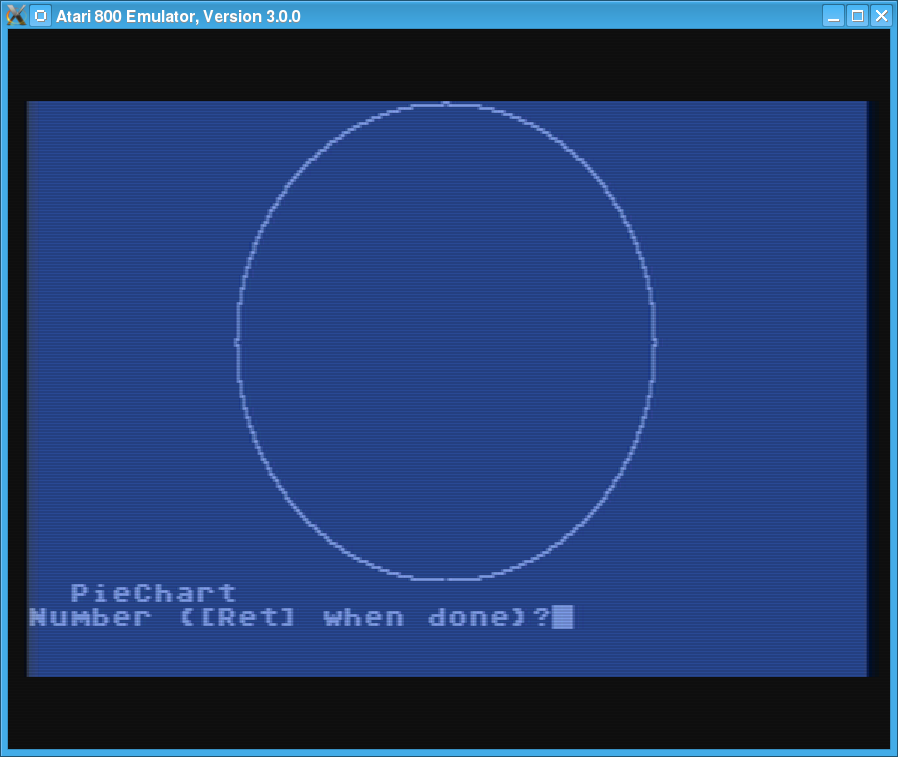
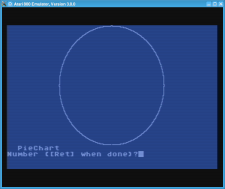
10 GRAPHICS 8
11 DPOKE 82,9984
12 ? "PieChart"
13 TRAP 30
14 C=0
15 DEG
16 COLOR 1
17 CIRCLE 159,80,80
18 DIM N(8)
|
- Switch to high-resolution (320×192) 2-color bitmapped graphics mode, with a text window at the bottom
- Set the text mode margins to 0 (left,
LMARGN) and 39 (right, RMARGN); (39×256)+0=9984
- Display title of the program
- Trap any errors (including a blank entry in the numeric
INPUT, or attempts to enter too many values into array N(), on line 20-21) to line 30, below
- Reset the count (
C) of how many numbers have been entered
- Switch trigonometric functions to degrees (vs. radians) mode
- Set painting color to 1 ("the" color, vs. the blank background, in 2-color mode)
- Draw a circle of radius 80 in the center of the bitmap area (159,80)
- Create space to store up to 8 values
|
|
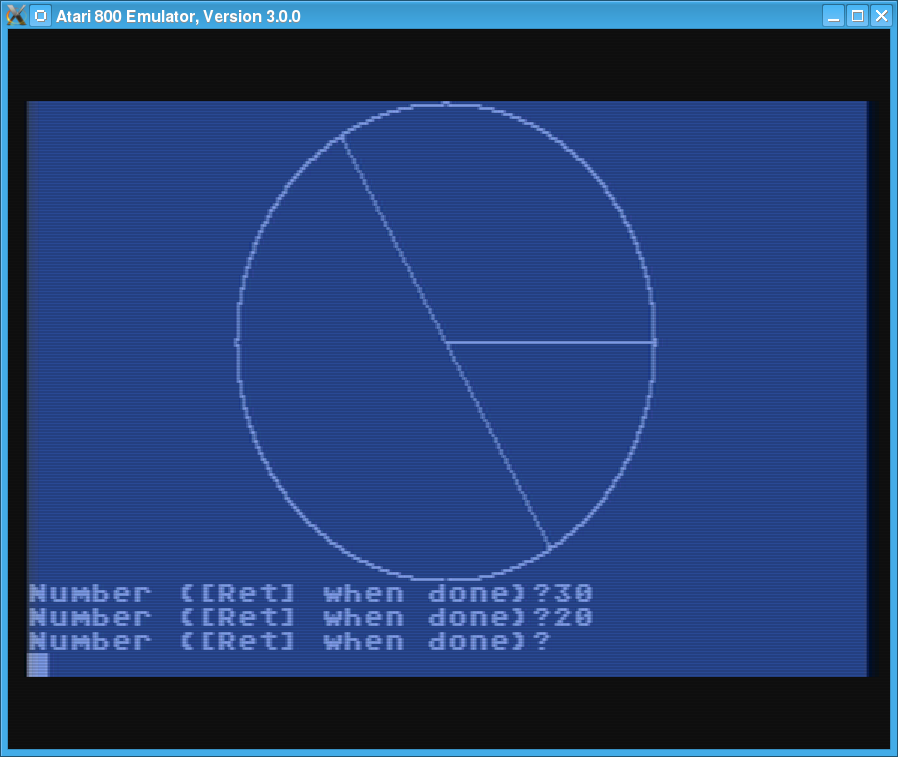
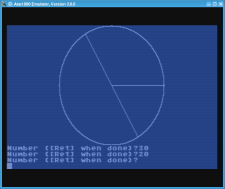
20 INPUT "Number ([Ret] when done)";A
21 N(C)=A
22 C=C+1
23 S=S+A
24 GOTO 20
|
- Prompt the user to enter a value, and record it (into
A)
- Store the value in the array (
N(C))
- Increment the count of numbers entered so far (
C)
- Add to the sum of all numbers entered (
S)
- Repeat!
So for example, after entering the three values "10", "30", and "20", we'd have:
C = 3
S = 60 (10+30+20)
N() contains 10, 30, and 20
|
|
30 TRAP 30
31 IF C<2
32   ? "Min 2"
33   GOTO 20
34 ELSE
35 IF C=9
36   ? "Max 9"
37   ENDIF
38 ENDIF
|
We arrive here when an error occurs. The expected situations are the
user entering a blank response when asked for a number (which we ask them to do,
to indicate they're done entering values to chart), or when we try to store
a value beyond the bounds of array N() (we've hit the program's
limit on the number of values that may be charted).
- Reset (keep) the error trap, to this line (since it gets cleared)
- If the user entered fewer than 2 values, tell them, and go back to the loop on line 20
- If the user entered more than 8 values, tell them, but then proceed
- Otherwise, we're proceeding now (e.g., user entered 2-8 values)
|
|
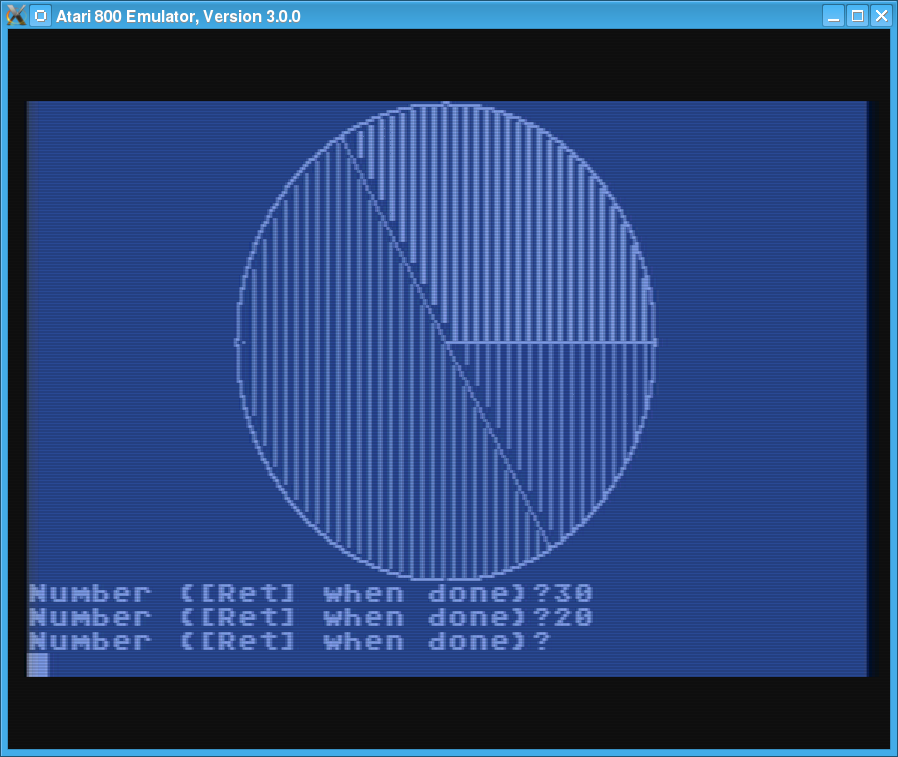
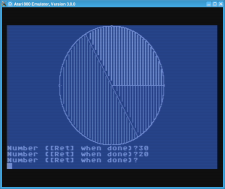
40 GOSUB 1000
41 POKE 87,9
42 G=0
43 FOR A=0 TO C-1
44   COLOR A+1
45   NN=(N(A)/S)*360
46   PAINT 17*COS(G+NN/2)+39,70*SIN(G+NN/2)+80
47   G=G+NN
48 NEXT A
|
- Jump to the segment-drawing code, below; keep in mind at this point the painting color is 1
- Trick the OS's drawing routines (via
DINDEX) into thinking we're in GRAPHICS mode 9; drawing routines will now assume 4 bits per pixel on an 80×192 bitmapped display
- Set the starting angle (
G) to 0; remember we're in degrees mode
- Begin a loop (using variable
A) that goes through the values we entered (from 0th to (C-1)-th)
- Set the color based on how far in the loop we are (starting with color 1); recall we can only accept up to 8 digits
- Calculate how much of angle the current segment (
N(A)), out of the total of all values (S), takes up; map it to 360 degrees
- Do a flood-fill within the segment (drawn via the
CIRCLE command above, and the routine at line 1000); the point it starts at is approx. 70 radius from center (keep in mind the OS thinks we're in 80×192 mode, so we divide the horizontal position by four to get that 17), at the half-way angle of the segment (via throwing G+(NN÷2) at the cosine/sine functions)
- "Move" to the next segment, by incrementing
G by the full angle of the segment (NN)
- Repeat the loop until we're done
In the end, you'll see a high res 2-color drawing of a pie chart, with a set of bit patterns (columns of on/off pixels) that fill the segments of the pie chart.
|
|
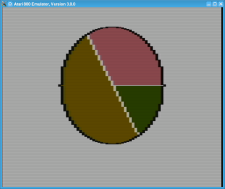
50 POKE 87,8
51 COLOR 0
52 CIRCLE 159,80,80
53 GOSUB 1000
54 POKE 623,128
55 POKE 87,9
56 COLOR 8
57 CIRCLE 39,80,20,80
|
- Tell the OS we're in
GRAPHICS mode 8; drawing routines back to assuming 1 bit per pixel (2 colors) on a 320×192 bitmapped display
- Set painting color to 0 (background; aka "erase")
- Draw a circle again (hence, erase the high-res circle)
- Jump to the segment-drawing code again (hence, erase the segment lines)
- Tell the GTIA chip to render the screen in
GRAPHICS mode 10 (via a bit in GPRIOR); this is an 80×192 bitmapped mode which utilizes the 9 color registers (that map 128 colors to different objects/aspects of the display, e.g. the four pairs of Players & Missiles, the border/background, colors of drawn pixels or text, etc.)
- Trick the OS's drawing routines (via
DINDEX) into thinking we're in GRAPHICS mode 9 again (see above)
- Set painting color to 8 (the "9th" color now available to the display)
- Draw a circle in the center of the screen; it's actually being drawn as an oval (20×80), since the pixels are about 4× as wide as they are tall (and hence the center being at (39,80) here)
|
|
60 GRAPHICS 42
61 DPOKE 704,12+18*256
62 DPOKE 706,36+70*256
63 DPOKE 708,100+132*256
64 DPOKE 710,164+228*256
65 POKE 712,0
|
- Ask the OS to flip the screen to
GRAPHICS mode 10 "for real" now (80×192 with 9 color-registered based colors, and no text window); in the end, this isn't particularly necessary, I suppose!
- Set the color registers (the Player/Missile ones:
PCOLR0 (the background), PCOLR1, PCOLR2, PCOLR3; and the playfield ones: COLOR0, COLOR1, COLOR2, COLOR3, and COLOR4) to some nice colors:
- Light grey (hue=0, brightness=12 ⇒ 12) — the background (704,
PCOLR0)
- Dark yellow (hue=1, brightness=2 ⇒ 18)
- Dark red-orange (hue=2, brightness=4 ⇒ 36)
- Medium red (hue=4, brightness=6 ⇒ 70)
- Medium cobalt blue (hue=6, brightness=4 ⇒ 100)
- Medium (hue=8, brightness=4 ⇒ 132)
- Medium blue-grey (hue=10, brightness=4 ⇒ 164)
- Medium green (hue=14, brightness=4 ⇒ 228)
- Black (hue=0, brightness=0 ⇒ 0) — also the outline of the circle (712,
COLOR4)
|
|
999 GOTO 999
|
Infinite loop. (Press [Break] or [Reset] to break out of the program,
and back to a READY prompt.)
|
|
1000 G=0
1001 FOR A=0 TO C-1
1002   PLOT 159,80
1003   DRAWTO 80*COS(G)+159,80*SIN(G)+80
1004   G=G+(N(A)/S)*360
1005 NEXT A
1006 RETURN
|
Similar to the segment-filling code on line 40, since it was based on this. Notice this code does not change, or make assumptions, about the painting color (set via COLOR); it is used to both draw, and later erase, the segment lines!
- Set the starting angle (
G) to 0; remember we're in degrees mode
- Begin a loop (using variable
A) that goes through the values we entered (from 0th to (C-1)-th)
- Plot a point in the center of the circle (at (159,80))
- Draw a line from there, to a point on the circle (at radius 80, out from the center (159,80)), based on the current angle (
G)
- "Move" to the next segment, by incrementing
G by the angle of the segment; that is, the angle of the current segment (N(A)), out of the total of all values (S), mapped to 360 degrees
- Repeat the loop until we're done
- Return from this subroutine
|
|